Why you need Github Automation?
Do you own your own repository on Github? Github provide a perfect blending of workflow to create your own CI (Continuous Integration) and CD (Continuous Deployment) strategy. The Github workflow can enable you to customize your Software Development Life cycle for your repository.
In this blog I will try to guide you through a custom GitHub workflow that I have deployed on my own repository to achieve an automation that I can use to control my own custom minimalistic automation.
How to configure Github?
Before we begin how to configure, we need to know a bit about the YAML file. YAML format is used mostly for writing configuration files. The syntax of the YAML file is quite simple and easy to understand. To know about YAML format, I would recommend you to check this Basic of YAML file
A complete configuration of the YML file that I have used for basic automation as of today when I am writing this blog is provided at the end of the page :: I might add new stuffs as days goes by (an ever changing phenomenon we do have in our software development, isn’t it? )
Before we begin with that’s lets get familiar with few terms on Github Workflow.
Automation Terms
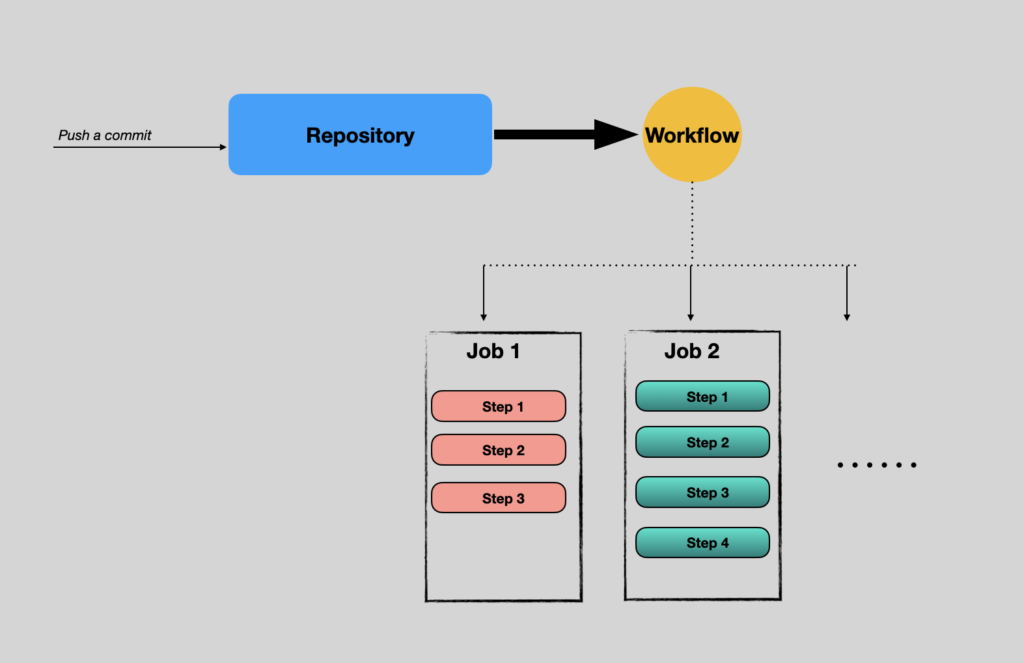
Workflow
A workflow is set of jobs that runs based on a particular event triggered on your repository. A workflow consists of multiple jobs. For example, if you push a commit to your repository, it will start a particular workflow that you have defined
Job
Job is a subset of workflow, that can run a set of steps. In a particular workflow it is allowed to run multiple jobs. And many steps can be performed in an order inside a job. You can also create job that can be depend on another job.
Step
Step is a specific shell script or command that can run individually. It can also be an action that can be executed in a step. Steps are run in sequential order inside a job and the dat can be shared among them.
Action
Action is a Github way of saying function in a C programming. I might be too naive to tell that. But to make it easier for you to understand, you have already defined set of repetitive steps that you can use instead of writing it yourself. Github Marketplace has many actions that are already defined that can be used for you purpose.
An example of that can be an action that will checkout your commit when you are running a step inside a job.
Automation Strategy for Github
After getting all the basic terminology explained, lets dive into the process of implementing the automation for Github. The YML file at the end of the page gives the complete automation that I have made to run a simple unit test for the Wave Parser application that I have developed.
01
Create a YML file
Create a YML file in a folder called .github/workflows in you repository.
02
Name the Workflow & Define event
Let’s name the work and define the event for which this workflow will be triggered. As shown below for push event the “Github Wave Parser Workflow” will be triggered.
name: GitHub Wave Parser Workflow
on: [push]
03
Define job
Define the name of the job and the runner (red text below). Runner the kind of OS that will be used for running the job. The available list of runner on Github can be found here.
jobs:
    Explore-GitHub-Actions:
        name: Test
        runs-on: ubuntu-latest
04
Define your steps and actions
After Workflow and Job is defined, the next step for you to create your customised steps that you want to run. A simple step that I have defined is explained below.
The first step defined below just print an information about the Job using shell command “echo”.
The next line just define the name of the next step or action in this case.
The 4th line is an example of an action that checkout the commit that has been been pushed to the repository. This is the kind of pre-defined action already available in the Github Action platform.
steps:
  - run:  echo "Job triggered by a ${{ github.event_name }} event."
  - name: Check out repository code
    uses: actions/checkout@v
05
Rest of the steps
Rest of the line is kind of explained in very briefly as below:
- Installing python 3.x version to be used for Meson build system
- Install Meson build and Ninja
- Installing libcheck to run unit test
- Run configure for wave_parser application
- Run unit test
- In case of failure in UT, upload the testlog.txt to artifactory
- Print status of the Job
Example of YML File (Link to Github)
name: GitHub Wave Parser Workflow
on: [push]
jobs:
  Explore-GitHub-Actions:
    name: Test
    runs-on: ubuntu-latest
    steps:
      - run: echo "Job triggered by a ${{ github.event_name }} event."
      - name: Check out repository code
        uses: actions/checkout@v3
      - name: Setup python
        uses: actions/setup-python@v1
        with:
          python-version: '3.x'
      - name: Install Meson
        run: pip install meson ninja
      - name: Install libcheck
        run: sudo apt-get install check
      - name: Configure wave parser
        run: meson setup builddir
        env:
          CC: gcc
      - name: Run unit test
        run: meson test -C builddir -v
      - uses: actions/upload-artifact@v1
        if: failure()
        with:
          name: Test log on Failures
          path: builddir/meson-logs/testlog.txt
      - name: Status
        run: echo "This job's status is ${{ job.status }}."


A small steps to describe the CI/CD automation in Github
A very useful information and very easy to follow the process.